Design a Cushioning Bumper for a Toy Car
Students design, test, and improve a bumper that safely stops a moving toy car while meeting limits on available materials.

Illustrations are auto-generated and may be placeholders. They can be refreshed to match the narration.
Introduce the Bumper Challenge
A moving toy car has energy of motion. If it hits a hard wall, it may stop very suddenly, bounce far, tip over, or become damaged. Your engineering challenge is to create a cushioning bumper between the car and a solid stop. The bumper should bend, squash, or compress so the car stops less suddenly. Imagine a toy car rolling down the same ramp each time. Without a bumper, it strikes the solid stop and bounces back 10 inches. A successful bumper might keep the car upright and reduce the bounce to 4 inches. Engineers begin by asking what problem they need to solve, who or what needs protection, and how they will know whether a solution works.

Identify Criteria and Material Limits
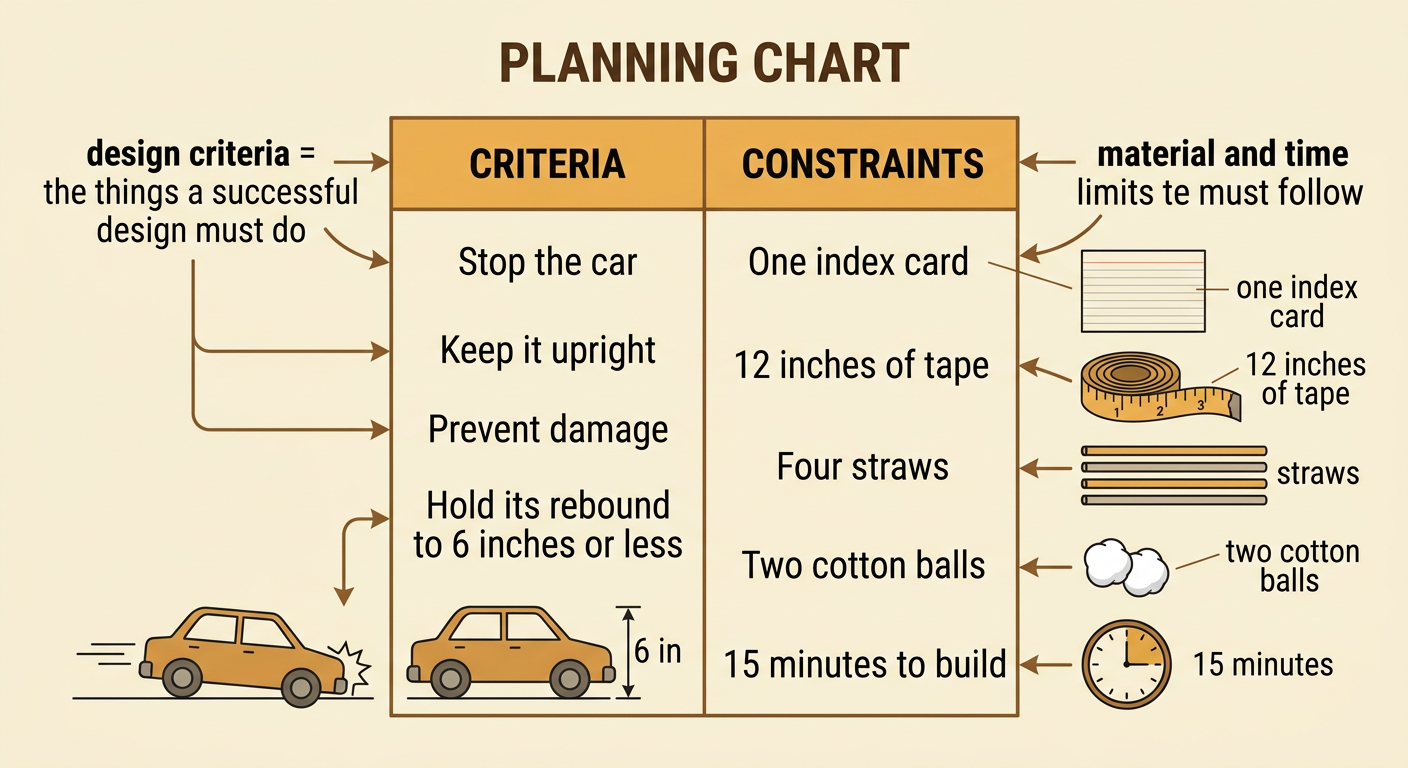
Criteria are the things a successful design must do. Constraints are limits that engineers must follow. For this challenge, the criteria might be to stop the car, keep it upright, prevent visible damage, and limit its rebound to 6 inches or less. The constraints might allow only one index card, 12 inches of tape, four straws, and two cotton balls. You may also have a 15-minute building limit. Materials have costs as well as benefits. Cotton is soft but may flatten quickly. Straws are springy but may cause a large bounce. Tape holds pieces together, but too much tape can make the bumper stiff. Record the criteria and constraints before building so every design is judged by the same fair rules.
Build a Cushioning Bumper
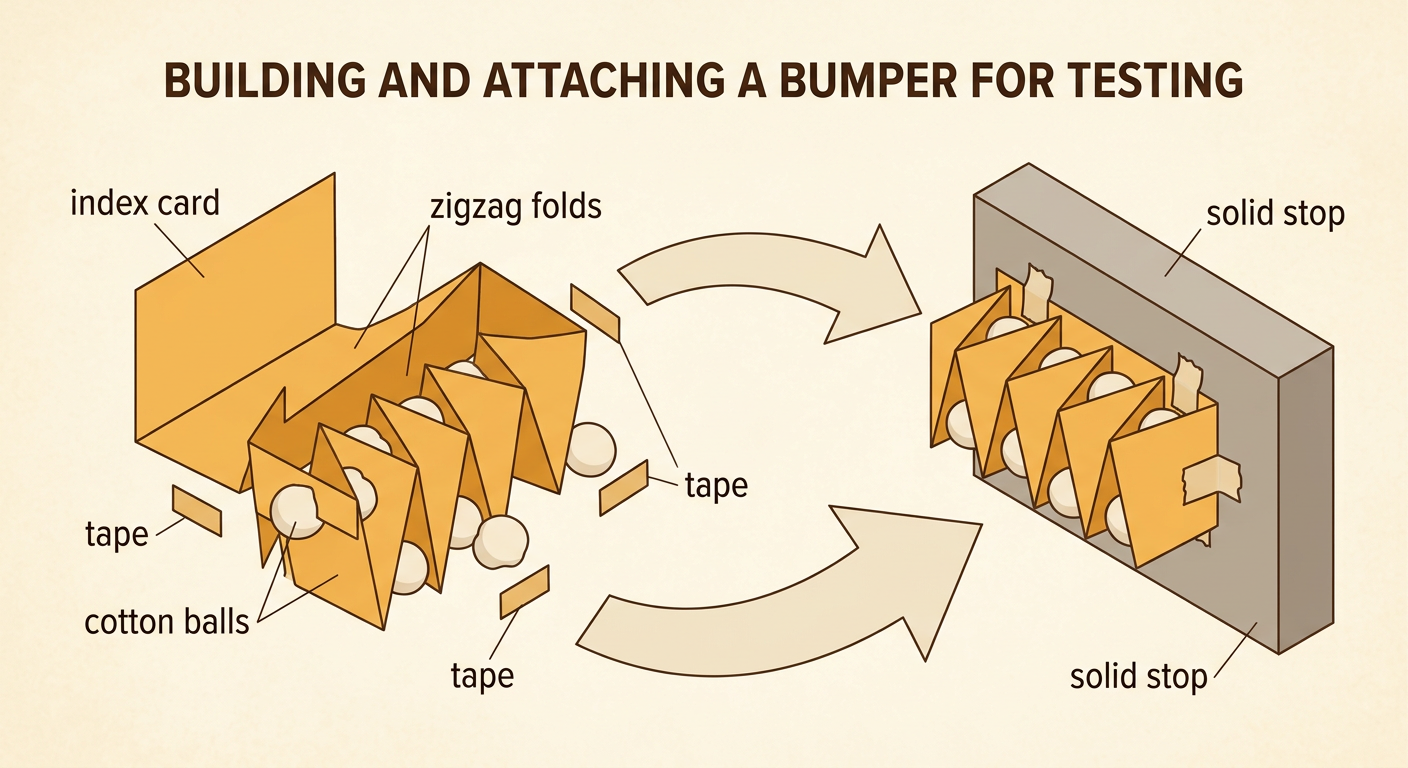
Plan before you build. Draw the bumper and label where each material will go. Think about how its shape can trap air, bend, or squash during a collision. For example, you could fold an index card into a zigzag shape, place cotton balls in the folds, and use short pieces of tape to hold it together. The zigzag folds act like small springs, while the cotton adds softness. Attach the completed bumper securely in front of the solid stop, not to the moving car, so each test uses the same setup. Check that no sharp straw ends point toward the car. Save some materials if you expect to make changes later. A neat, strong connection helps ensure that you are testing the cushion rather than loose pieces.
Test and Measure Each Design
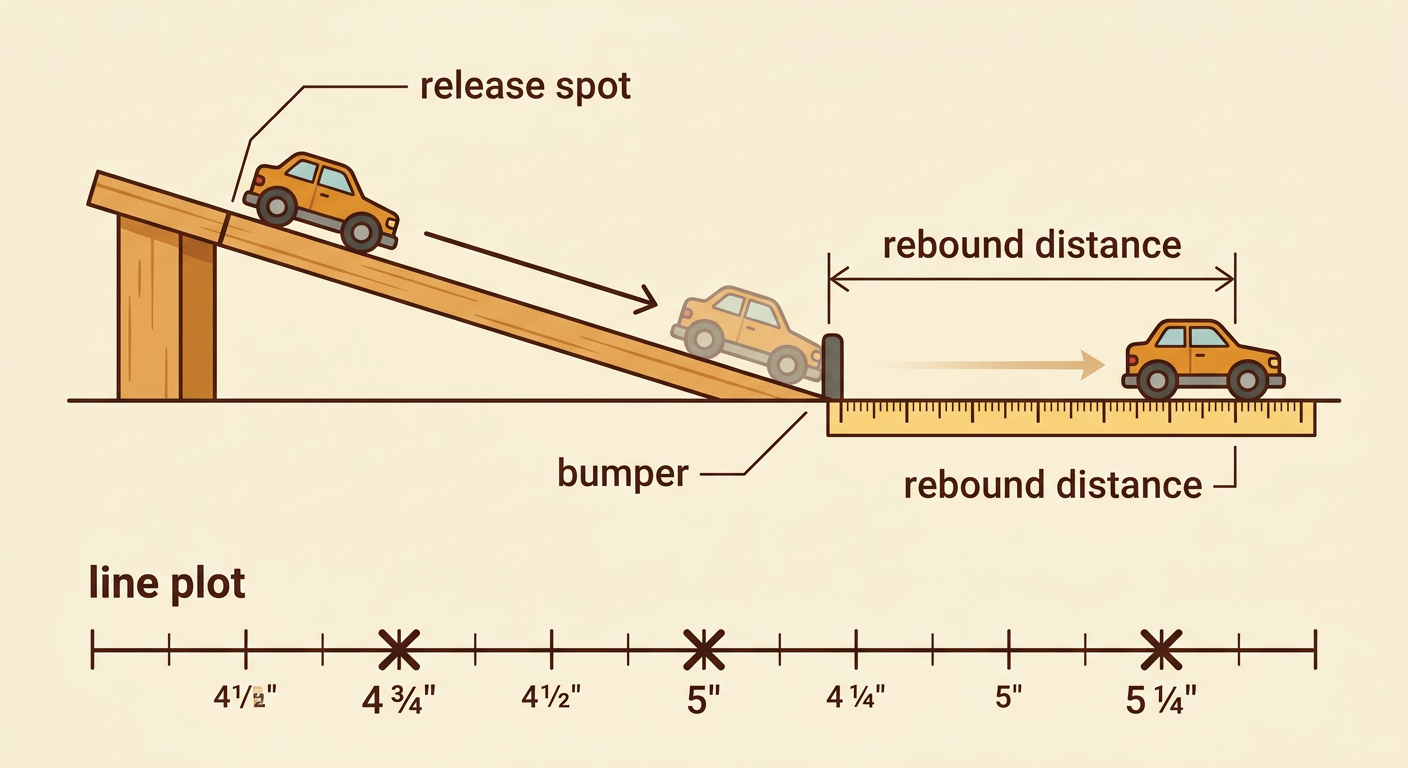
Use a fair test so the results can be compared. Release the same car from the same marked spot on the ramp without pushing it. After the car hits the bumper and comes to rest, measure its rebound distance from the bumper to the front of the car. Measure to the nearest quarter inch. Also record whether the car stayed upright and whether the bumper remained attached. Test each design at least three times because results can vary. For example, Design A might rebound 5 inches, 4 3/4 inches, and 5 1/4 inches. Place an X above each distance on a line plot. Repeated measurements and a line plot make patterns easier to see and provide stronger evidence than one trial alone.
Compare Results and Improve
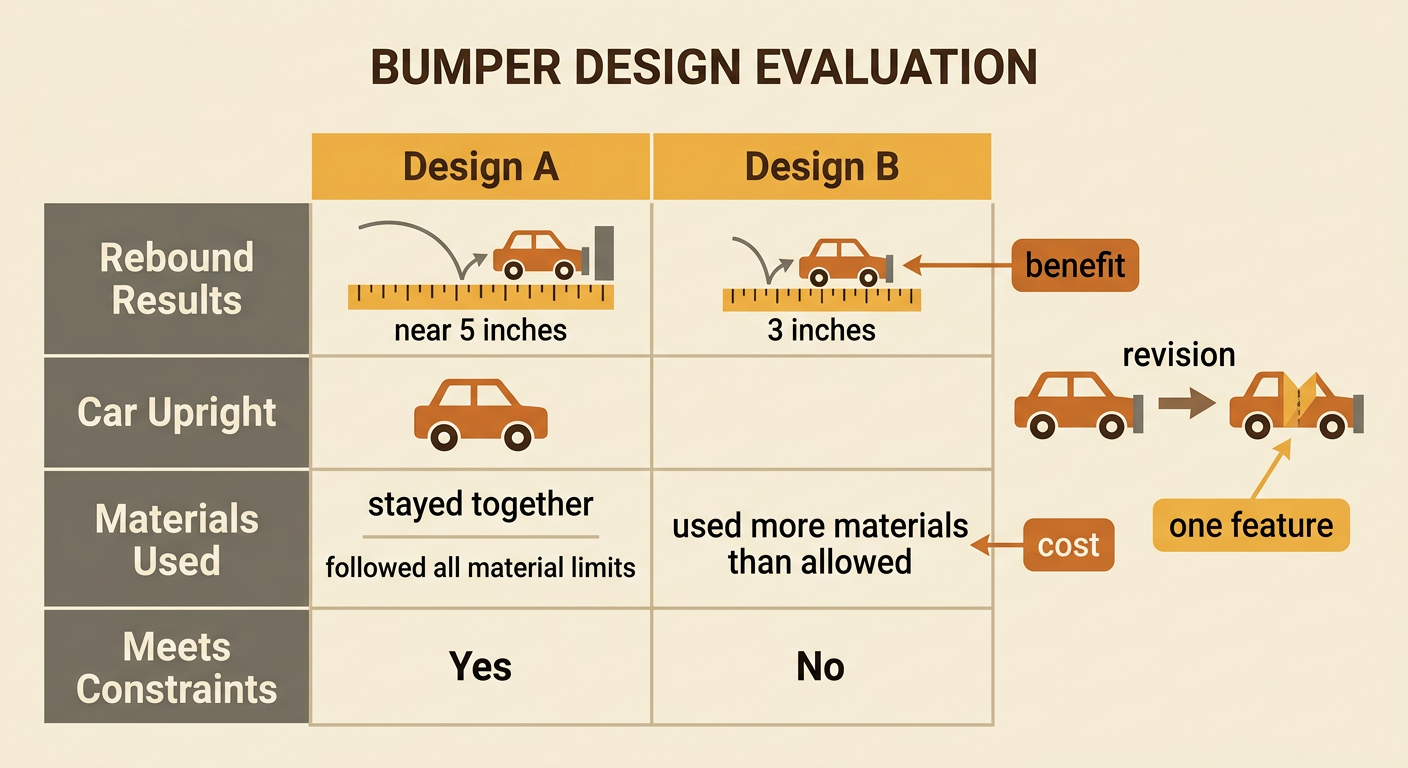
Compare each design with the criteria, not just with the other designs. Look at the rebound measurements, whether the car tipped, and whether the bumper broke or moved. Suppose Design A had an average-sized rebound near 5 inches and stayed together, while Design B rebounded only 3 inches but used more materials than allowed. Design A meets the constraints, but Design B does not. Consider benefits and costs before improving the bumper. Adding cotton may reduce the bounce, but it uses a limited material. Adding tape may strengthen a weak joint, but it may also make the cushion too stiff. Change only one feature at a time, such as the number of folds. Then retest under the same conditions to find out whether that change helped.
Explain the Final Design Choice
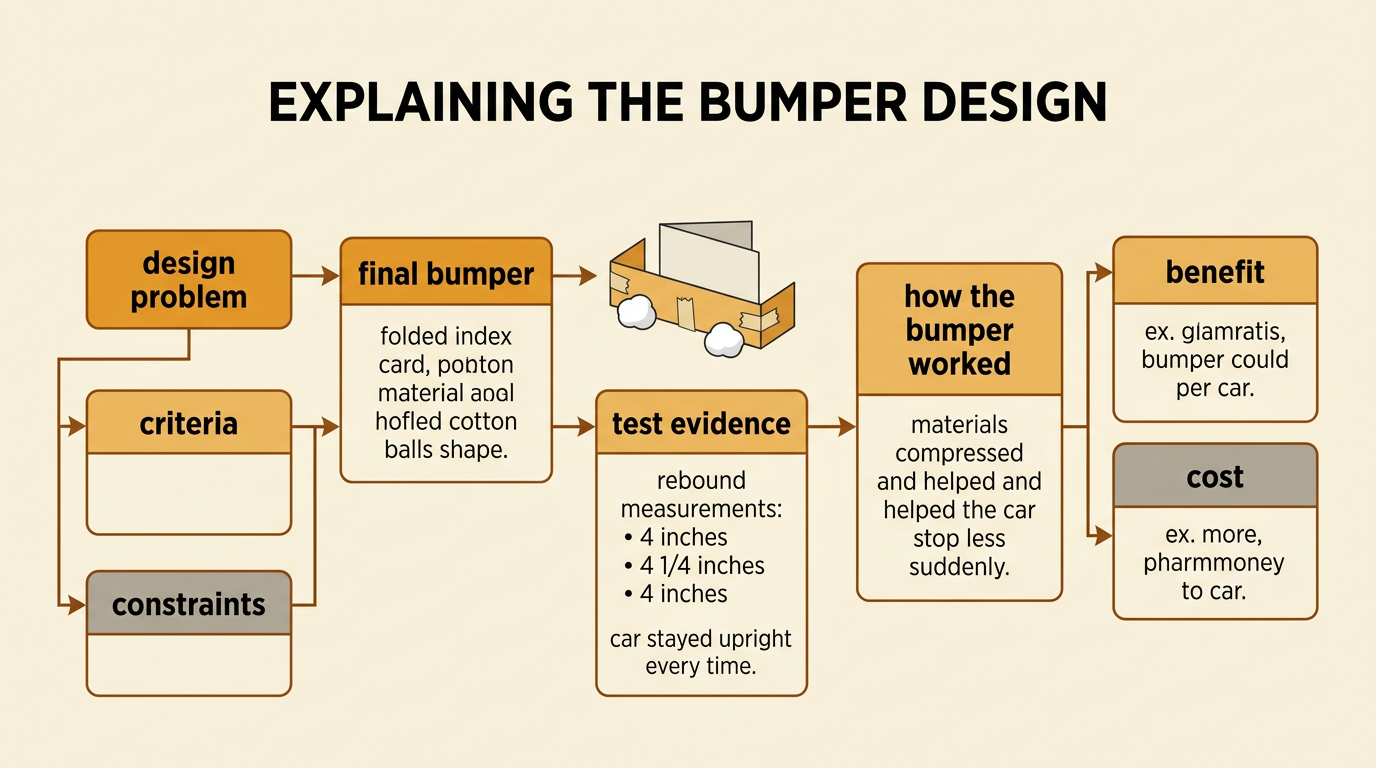
Write an informative explanation that tells what you built, how it worked, and why you chose it. Begin by stating the design problem and the criteria and constraints. Next, describe the materials and shape of the final bumper. Use measurement facts from your tests as evidence. For example, you might write, “Our final bumper used a folded index card, two cotton balls, and 8 inches of tape. Its three rebounds were 4 inches, 4 1/4 inches, and 4 inches. The car stayed upright in every trial.” Explain the science by noting that the materials compressed and helped the car stop less suddenly. End by comparing a benefit and a cost, such as a smaller rebound but more building time, and explain why the benefits made this design the best choice.