
Mapping Our Classroom
Students explore how maps use shapes, symbols, and position words to represent familiar places and create a simple map of their classroom.

Illustrations are auto-generated and may be placeholders. They can be refreshed to match the narration.
What Is a Map?
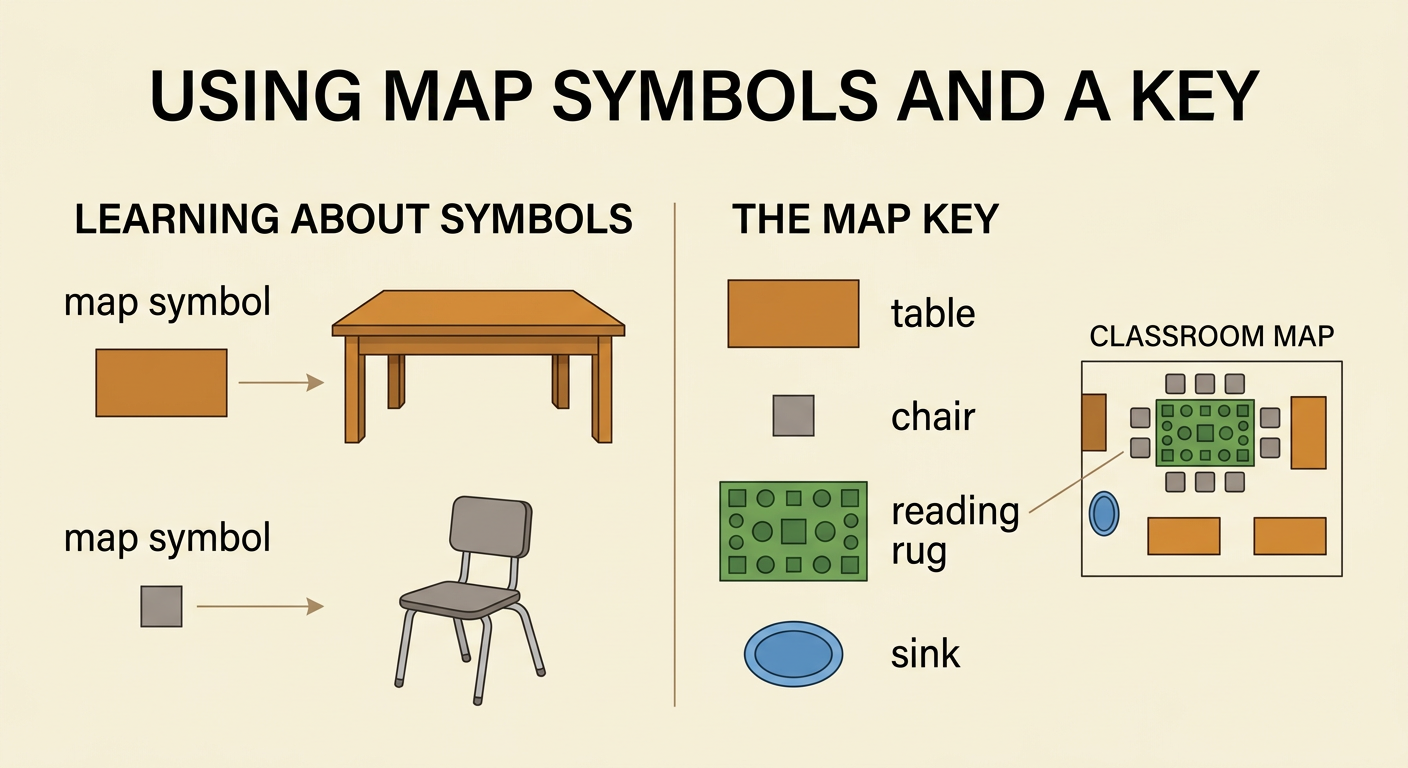
A map is a drawing that shows where things are in a place. A map can show a big place, such as a town, or a small place, such as our classroom. Classroom maps often look down from above, as if we were looking through the ceiling. Shapes and pictures stand for real objects. A rectangle might stand for a table, and a small square might stand for a chair. The objects on a map are smaller than the real objects, but they are placed in matching locations. For example, if the reading rug is near the classroom door, the map should show the rug near the door symbol. A map helps us find places and explain where things are.

Notice Classroom Landmarks
A landmark is an object or place that is easy to notice and find. Classroom landmarks can help us understand and make a map. Look around for large, familiar objects that usually stay in one place. The door, windows, teacher's desk, reading rug, sink, and bookshelves may be useful landmarks. Notice each landmark's shape and location. Is the reading rug a rectangle? Is the clock a circle? Is the bookshelf beside a wall? For example, you might say, “The sink is near the door.” Walk slowly around the room with your teacher and point to several landmarks. Choose landmarks that will help someone know which way to face and where to go. These important objects will become features on your classroom map.

Learn Map Symbols
A map symbol is a simple shape or picture that stands for something real. Symbols make a map clear and easy to draw. A rectangle can stand for a table or bookshelf. A small square can stand for a chair. A blue oval can stand for a sink. A curved line in a wall can show which way a door opens. Mapmakers use a key to explain what their symbols mean. For example, a map key might show a green rectangle next to the words “reading rug.” Then every matching green rectangle on the map means a reading rug. Symbols do not need to show every tiny detail. They should be simple, easy to recognize, and used the same way across the whole map.
Practice Position Words
Position words tell where one object is compared with another object. These words help us describe a room and read a map. An object can be beside, between, in front of, behind, near, or far from another object. We can also use left and right after choosing which way we are facing. Look at two classroom landmarks and make a position sentence. For example, “The reading rug is beside the bookshelf.” You might also say, “The teacher's desk is in front of the board,” or “The pencil cup is on the table.” Check the map to see whether the symbols show the same positions. Remember that position words describe a relationship. If a chair is between two tables, the map should place the chair in the middle of those table symbols.

Draw a Classroom Map
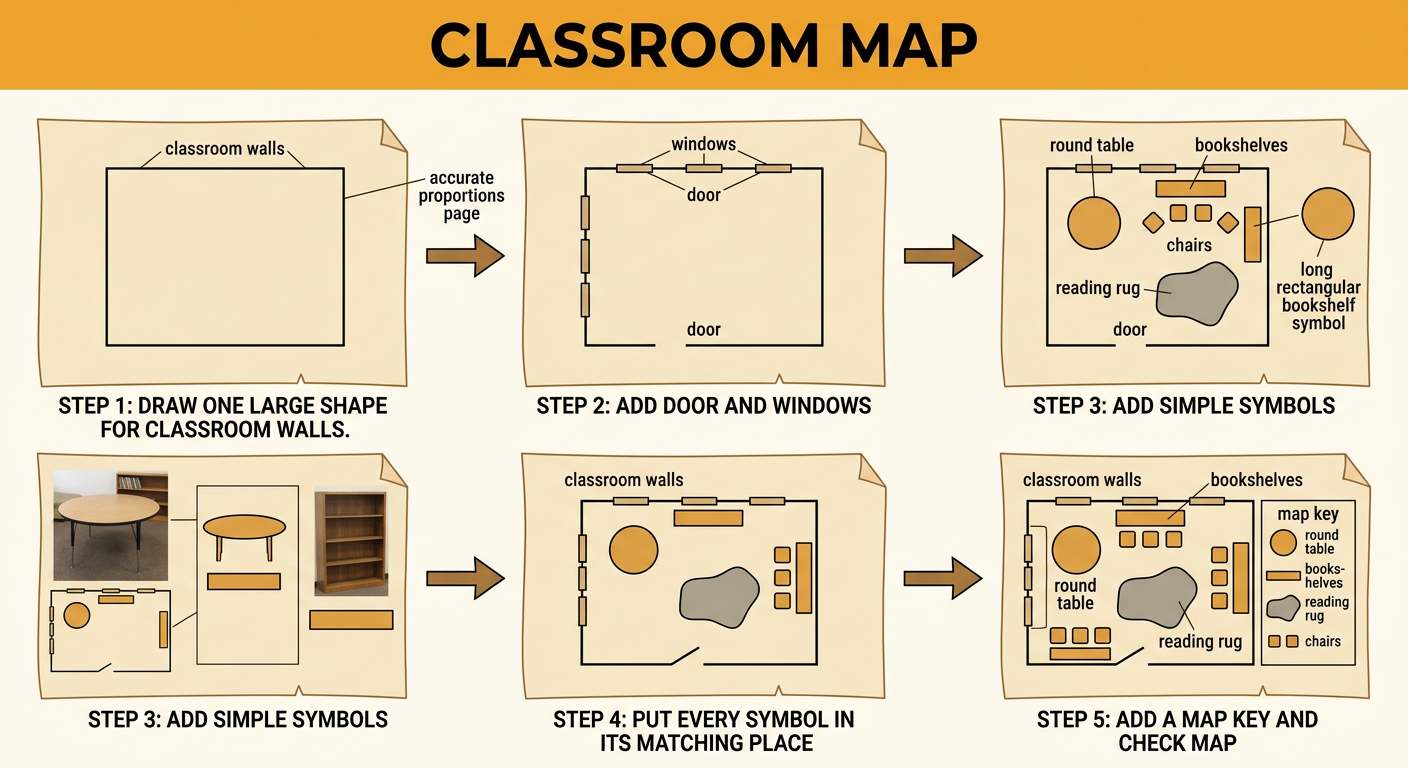
Now create a simple map of your classroom. First, draw a large shape for the classroom walls. Add the door and windows in the correct places. Next, draw simple symbols for important landmarks, such as tables, chairs, the reading rug, and bookshelves. Think about how each object's shape helps it work. A round table lets students sit around its edge, while a long rectangular bookshelf holds books in rows. Use a similar shape on your map to represent each object. Place every symbol where the real object belongs. Then add a map key that explains your symbols. For example, draw a small red rectangle in the key and label it “table.” Finally, check your map by comparing it with the classroom and fixing any misplaced features.
Share and Follow a Route
Share your finished map with a partner. Point to the map key and explain what two or three symbols mean. Then describe where a landmark is by using position words. For example, say, “The reading rug is beside the bookshelf and near the windows.” Next, draw a route as a line with an arrow. The arrow shows the direction to travel. You might begin at the door, walk past the tables, and stop at the reading rug. Ask your partner to trace the route with a finger and then follow it safely in the classroom with teacher permission. Give one step at a time, such as, “Start at the door. Go beside the tables. Stop on the rug.” If the route is confusing, work together to change the line or directions.
