Testing and Improving Web Page Accessibility
Students audit a simple web page for accessibility barriers and revise its HTML using semantic headings, descriptive alternative text, and clear link labels.

Illustrations are auto-generated and may be placeholders. They can be refreshed to match the narration.
Why Digital Accessibility Matters
Digital accessibility means designing websites so people with different abilities can find, understand, and use the information. Some visitors use screen readers, keyboard controls, enlarged text, or other assistive technology. Accessible design supports equal participation, which connects to the civic principle that people should have fair access to public information and services. For example, imagine a city website posts emergency shelter locations as unlabeled images. A person using a screen reader may not learn where to go. If each image has useful alternative text and the page has meaningful headings, that person can get the same critical information as other visitors. Accessibility does not help only people with permanent disabilities. It can also help someone with a temporary injury, a slow internet connection, or a device with a small screen.

Identify Common Accessibility Barriers
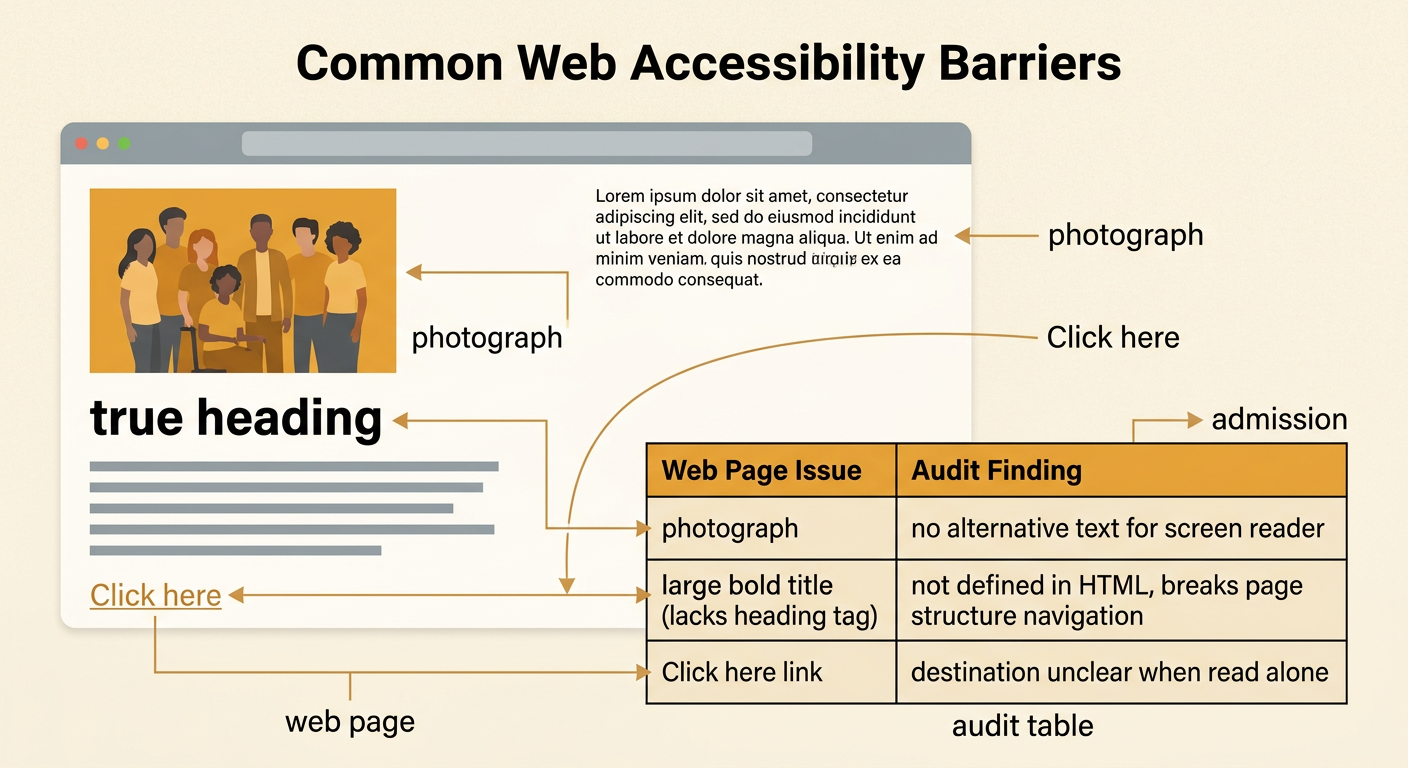
An accessibility barrier is a design choice that makes content difficult or impossible for some people to use. Common barriers include missing alternative text, headings chosen only for their size, vague links, low color contrast, and controls that require a mouse. Examine a school club page with a photograph, a large bold title, and a link labeled “Click here.” If the photograph has no alternative text, a screen reader cannot communicate its purpose. If the title is only enlarged text instead of a true heading, assistive technology may not recognize the page structure. “Click here” also hides the link’s destination when read by itself. Record each barrier in an audit table with columns for location, problem, affected user, and possible revision. This consistent process makes different solutions easier to compare.
Inspect the HTML
Inspect the HTML in a careful sequence instead of judging only the page’s appearance. First, open the page source or developer tools. Second, locate the main title and section titles. Check whether they use heading elements in a logical order, beginning with one h1 element and continuing with h2 elements for major sections. Third, locate every image element and check for an alt attribute. The alternative text should communicate the image’s meaning or purpose; a decorative image can use an empty alt attribute so a screen reader skips it. Fourth, inspect each anchor element and read its link text without the surrounding sentence. For example, a link coded with the words “View the robotics meeting schedule” explains its destination, while “Click here” does not. Finally, record evidence from the HTML before making changes.

Revise for Accessible Design
Revise the HTML by choosing solutions that provide the clearest meaning with the least confusion. Give the page one descriptive h1 heading, then use h2 headings for major sections rather than selecting headings only to change text size. Add concise alternative text that communicates an image’s purpose. For a photo showing students testing a robot, “Students test a wheeled robot in the engineering lab” is more useful than “photo” or a long list of visual details. Replace a vague link such as “Learn more” with “Read the robotics competition rules.” Compare possible revisions using the same criteria: clarity, accuracy, ease of navigation, and usefulness with assistive technology. Keep the solution that performs best across those criteria. Do not place important information only in an image when it can also be provided as HTML text.

Test and Justify Improvements
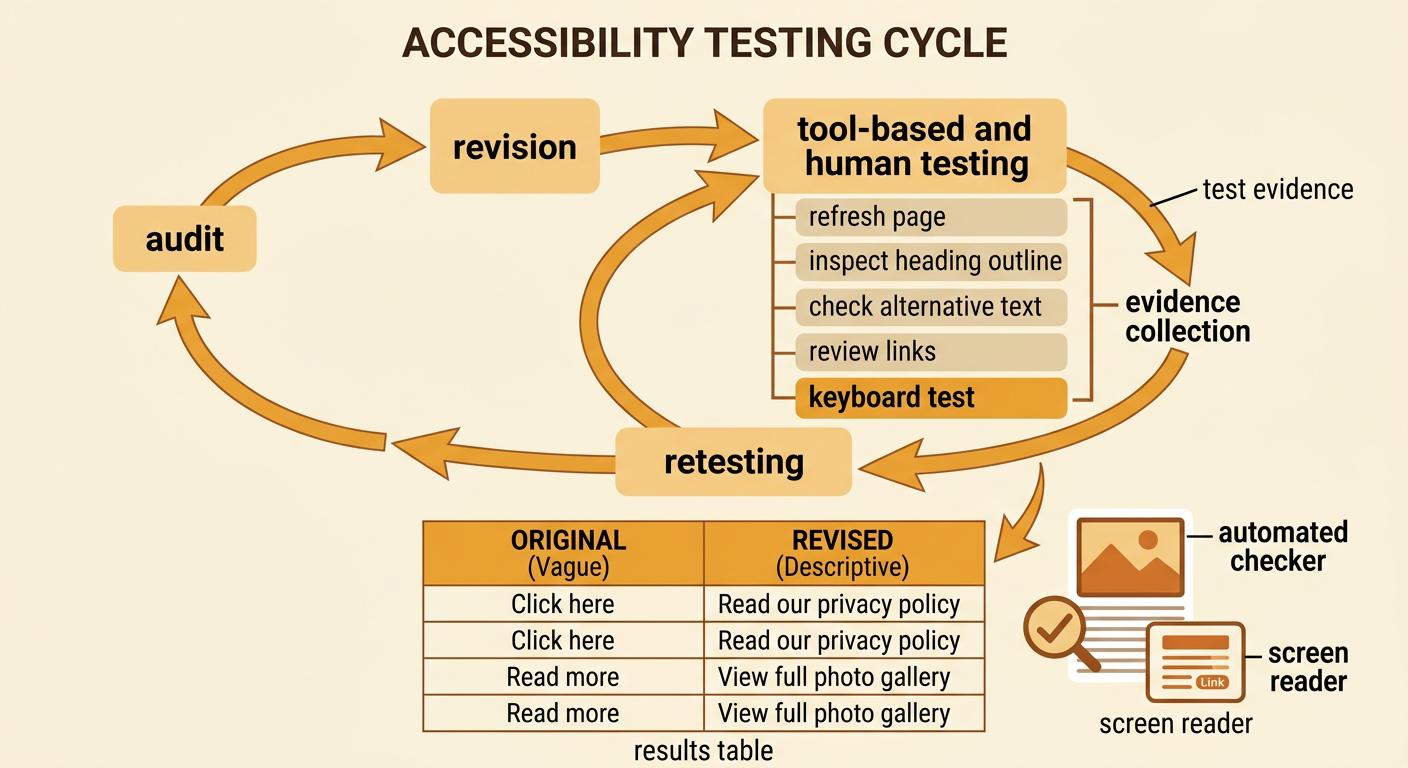
Testing determines whether revisions solve the identified problems. Follow a repeatable procedure: refresh the page, inspect the heading outline, check image alternative text, review links out of context, and navigate interactive items using only the keyboard. If available, use a screen reader or an automated checker, but do not depend on one tool alone because automated tools cannot judge every meaning. For example, a checker may confirm that an image has an alt attribute, yet a person must decide whether “image123” describes the image accurately. Create a results table listing each barrier, the original design, the revision, the test evidence, and the reason the revision is better. A strong justification might state that “Read the robotics competition rules” identifies the destination before activation, supporting independent navigation and fair access to school information. Retest after every major change.